ACME Control Surface

(Only compatible with vMix)

ACME Control Surface Main

What Is ACME Control Surface?

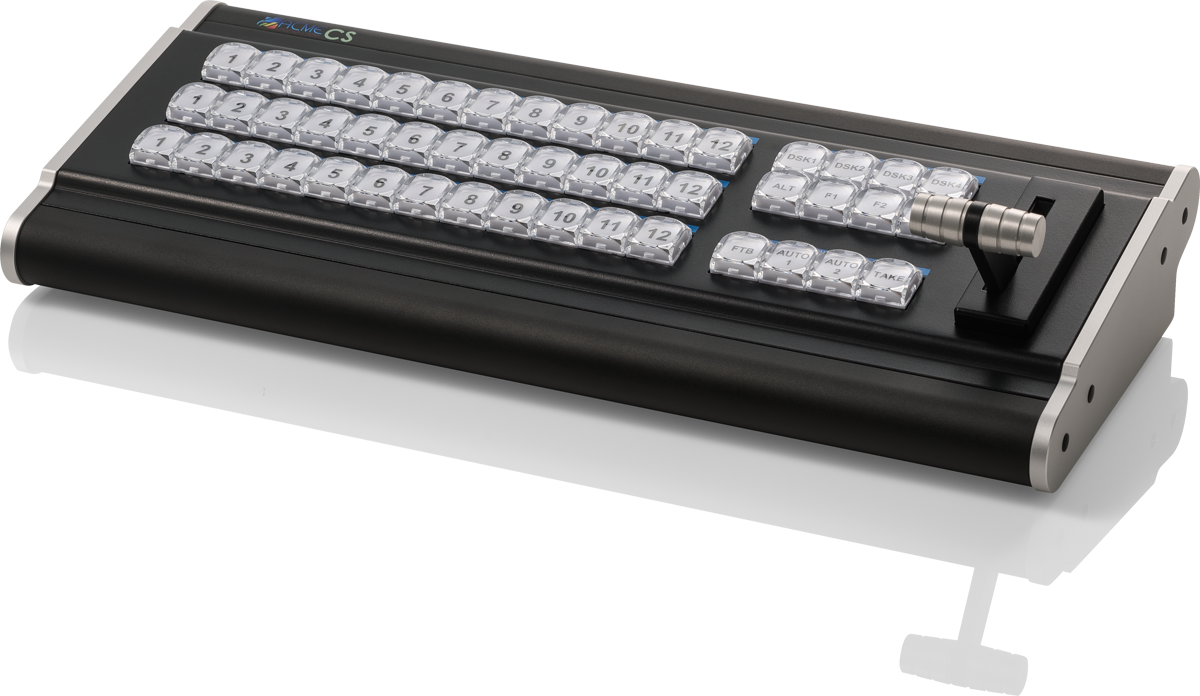
The ACME Control Surface (only compatible with vMix) is the perfect complement to the ACME GO and ACME RACK. It connects via USB and brings that tactile control to any vMix production by providing a traditional production switcher interface. Using the control surface allows additional personnel to handle titles, graphics, replays and other show tasks while the operator continues to switch the show. Simply plug in and start producing professional live broadcasts.

Bus Buttons

Overlay / Program / Preview Bus

Function Buttons

Overlay / Functions Buttons
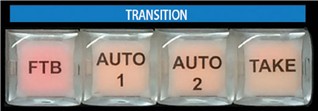
Transition Buttons

Transition Buttons

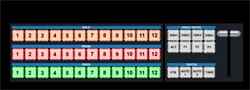
Overlay Bus (Top Row)

In vMix, graphics placed on top of other sources are known as Overlays. These are also known as Down Stream Keyers (DSK) because the graphics are usually "keyed" over live video after any upstream effects are applied. The DSK buttons on the Control Surface correspond to the 1 through 4 numbers underneath each input in vMix.

  1. Select the Overlay channel you wish to use. Example: if you want to overlay an input on channel 1, press the DSK1 button. It will now light up indicating overlay channel one on the first 12 inputs is ready to be used.
  2. Press the desired input you wish to overlay. Example: if you have a lower third title in input 6, press button 6 on the Overlay row. Button 6 will then light up indicating that input 6 is overlaid on channel 1 of the chosen input.
  3. To see which inputs are currently active on each overlay channel, you can cycle through the 4 DSK buttons. If an overlay channel has an active input, the corresponding input will light up.

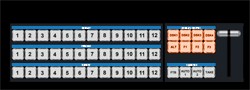
Program Bus (Middle Row)

Press the number of the input on the Program row that you want to assign to the Program or Output.

This will cut or take the input directly to output without any transitions.

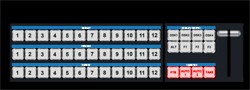
Preview Bus (Bottom Row)

Press the number of the input on the Preview row that you want to assign to Preview.

Overlay Preview Program Bus
Overlay Function Buttons

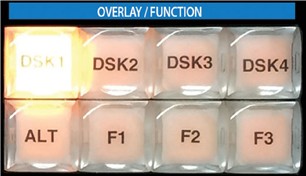
Function Buttons (F1, F2, F3)

  1. To program the Function buttons, open up the settings window in vMix and click the Shortcuts tab.
  2. Click Add and a new window opens, with drop down menus showing usable keys and available vMix shortcuts.
  3. Click the Key drop down and scroll down to SurfaceF1, SurfaceF2, SurfaceF3. These correspond to the F1, F2 and F3 keys on the Control Surface.
  4. Select the desired Function. Example: if you wanted a button to start recording, select Start Recording.
  5. Press Ok and the selected function button is now ready to be used.

ALT Button

The ALT button can be held down in conjunction with other buttons in order to change their functionality.

This will allow enhancements to be added to future updates of vMix.

It presently operates as follows:

  1. Hold down ALT while pressing a Preview row button to start playing that input if it is a video clip.
  2. Hold down ALT while pressing one of the Overlay row buttons to turn on that overlay in the Preview window instead of directly to Program/Output. During the next transition the previewed Overlay will automatically be activated over the top of Program/Output.

Transition Buttons

In live switching, changing from one camera or clip to another is called a transition. The vMix Control Surface has three available transition types available, corresponding to transition buttons in vMix.

  1. For a hard cut between two inputs, press the "Take" button.
  2. To use a stylized transition such as a wipe, fade or zoom, there are customizable transitions located at the top of the vMix interface. "Auto 1" and "Auto 2" correspond to the first two transitions below Cut. When these transition types are changed in the vMix window, the transition will also change for the buttons.
  3. Press "FTB" to fade the live output to a black screen. (Fade To Black)
Transition Buttons

Key Features

ACME CS 2
  • Keys: The high-quality professional key switches are color backlit with customizable LEDs
  • Power/Communication: Powered using an included 3.3' USB cable; low latency communication
  • Input Switching: Twelve program, preview, and overlay buttons in traditional cross-point layout for input control
  • DSK: Four downstream keyer buttons to activate overlays
  • Transitions: Two transition buttons to control vMix configured transitions
  • including Cut, Fade, Zoom, Wipe, Slide, Fly, CrossZoom, FlyRotate, Cube, and CubeZoom. Take button are provided for quick cuts
  • T-Bar: Smooth motion T-bar enables clean transitions between sources
  • Function Keys: User assignable functions keys control vMix Shortcuts including complex macro-styled trigger events

Request More Info

We welcome your questions and inquiries, and will be happy to assist you in any possible way! Contact us via this form or simply call us.